Table of contents
No headings in the article.
In Jetpack compose, we can clip our view with shapes such as Rounded rectangles, circles, etc. But what if we need to have our own shapes? Here comes to our rescue Paths.
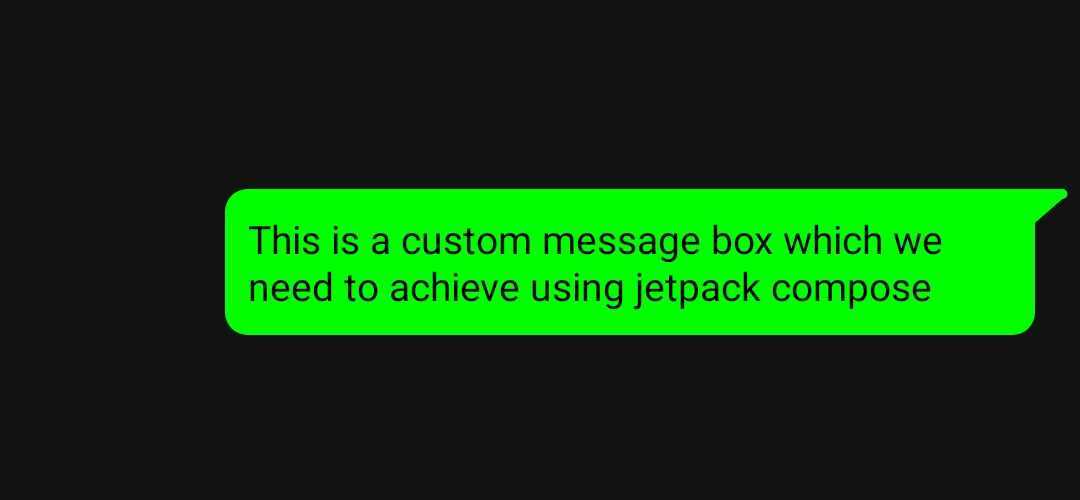
Let us take the below example of a chat message box.

From the above image, as we can see this shape is partially possible with a rounded rectangle, but how can we draw the arrow at the top on the right side? Seems complicated? but it is not what you think.
Let's divide this problem statement into multiple parts as follows.
- Draw the rounded corner at the left top.
- Draw the rounded corner at the left bottom.
- Draw the rounded corner at the right bottom.
- Draw the arrow at the right top.
By looking at the above picture, we can say that we need to draw multiple arcs and lines. Let us understand the basics first how can we draw arcs we will later on move on to draw the required shape. By the end of this article, you will master drawing custom shapes with paths in jetpack compose.
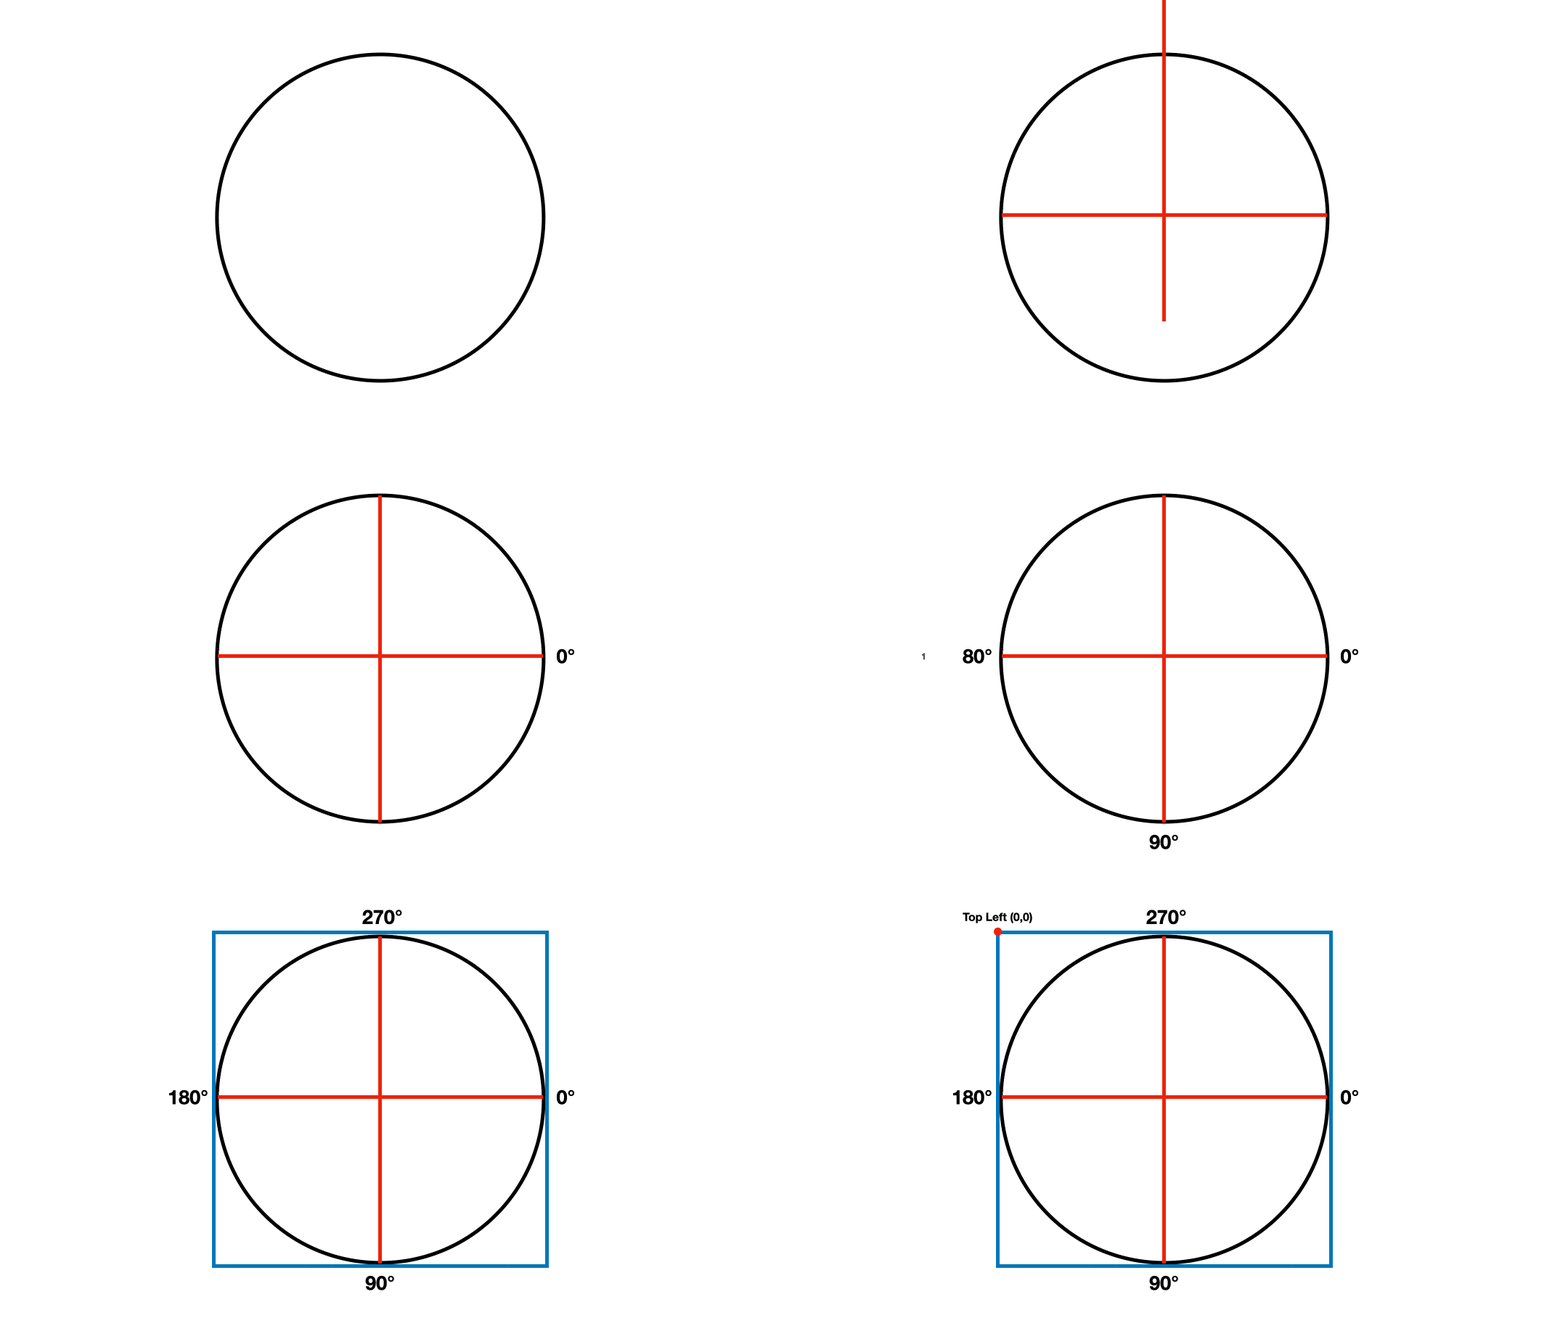
Fig.1 Denotion of drawing w.r.t circle degree and rectangle

By looking at the contract of drawing an arc using a path, we can see that it requires a rect, start angle, sweep angle, and force move to flag.
fun arcTo(
        rect: Rect,
        startAngleDegrees: Float,
        sweepAngleDegrees: Float,
        forceMoveTo: Boolean
    )
Let us go one by one.
- let's start with rect first. Rect required a top left x and y coordinates i.e Offset, and the size of the rect. you can refer to the animated GIF to see where the top left coordinates start.
fun Rect(offset: Offset, size: Size): Rect
You need a startAngleDegrees to start Arc from. The animated reveals various degrees an arc can start from. Consider we need to draw an arc at the bottom right. From the animated GIF, you can see that we can use 90° to start the arc until 180°. So the startAngleDegrees here will be 90°
You need a sweepAngleDegrees to draw an Arc, so if the startAngleDegrees is 90° and the sweepAngleDegrees is 90°, here the arc will be drawn from starting point of 90° until 180°, since the sweep angle is 90° here.
Last is forceMoveTo, which signifies where to start a new subpath consisting of an arc segment. We will keep it false.
For drawing a custom shape, we will need to implement the Shape interface from compose ui package. Let's look at the shape interface contract.
@Immutable
interface Shape {
    /**
     * Creates [Outline] of this shape for the given [size].
     *
     * @param size the size of the shape boundary.
     * @param layoutDirection the current layout direction.
     * @param density the current density of the screen.
     *
     * @return [Outline] of this shape for the given [size].
     */
    fun createOutline(size: Size, layoutDirection: LayoutDirection, density: Density): Outline
}
From the above code, we can see that we have a size object of layout, which contains composable width and height.
Let's visualize the shape using the below animation.

Hope you have the complete picture in your mind, of how we can draw our custom view. Let's get our hands dirty!
class RightBubbleShape(
    private val cornerShape: Float,
    private val arrowWidth: Float,
    private val arrowHeight: Float
) : Shape {
    override fun createOutline(
        size: Size,
        layoutDirection: LayoutDirection,
        density: Density
    ): Outline {
        return Outline.Generic(Path().apply {
            reset()
            // 1. Move to x = cornerShape (16), y = 0
            moveTo(cornerShape, 0f)

            // 2. Draw a line till x = composableWidth + arrowWidth and y = 0
            lineTo(size.width + arrowWidth, 0f)

            // 3. From the above animation we can see that we need to draw an arc,
            // for that we will need to reach top left to draw a rectangle.

            //So we move to rect top left = [x = composable width + arrow width] and y = 0

            arcTo(
                rect = Rect(
                    offset = Offset(size.width + arrowWidth, 0f),
                    size = Size(10f, 10f)
                ),
                startAngleDegrees = 270f,
                sweepAngleDegrees = 180f,
                forceMoveTo = false
            )

            // 4. Now draw the slanting line
            lineTo(size.width, arrowHeight)

            // 5. Move to bottom now.
            lineTo(size.width, size.height - cornerShape)

            // 6. Again draw the bottom left arc pointing the top left x & y coordinates
            arcTo(
                rect = Rect(
                    offset = Offset(size.width - cornerShape, size.height - cornerShape),
                    size = Size(cornerShape, cornerShape)
                ),
                startAngleDegrees = 0f,
                sweepAngleDegrees = 90f,
                forceMoveTo = false
            )

            // 7. Now draw the bottom line from left to right side
            lineTo(size.width - cornerShape, size.height)

            // 8. Again draw the bottom right arc pointing the top left x & y coordinates
            arcTo(
                rect = Rect(
                    offset = Offset(0f, size.height - cornerShape),
                    size = Size(cornerShape, cornerShape)
                ),
                startAngleDegrees = 90f,
                sweepAngleDegrees = 90f,
                forceMoveTo = false
            )

            //9. Draw the bottom to top line on right side
            lineTo(0f, cornerShape)

            //Draw the final top right arc and Wola!!!!
            arcTo(
                rect = Rect(
                    offset = Offset(0f, 0f),
                    size = Size(cornerShape, cornerShape)
                ),
                startAngleDegrees = 180f,
                sweepAngleDegrees = 90f,
                forceMoveTo = false
            )
            close()
        })
    }
}
Now, create a modifier extension to use it with any modifier.
fun Modifier.drawRightBubble(
    bubbleColor: Color,
    cornerShape: Float,
    arrowWidth: Float,
    arrowHeight: Float
) = then(
    background(
        color = bubbleColor,
        shape = RightBubbleShape(
            cornerShape = cornerShape,
            arrowWidth = arrowWidth,
            arrowHeight = arrowHeight
        )
    )
)
Let's give it a final touch on how to use it.
@Composable
fun MessageBox(message: String) {
    val cornerShape = with(LocalDensity.current) { 16.dp.toPx() }
    val arrowWidth = with(LocalDensity.current) { 8.dp.toPx() }
    val arrowHeight = with(LocalDensity.current) { 12.dp.toPx() }
    Column(
        modifier = Modifier
            .fillMaxWidth()
            .wrapContentSize()
            .padding(end = 16.dp, start = 80.dp),
        horizontalAlignment = Alignment.End
    ) {
        Box(
            modifier = Modifier
                .fillMaxWidth()
                .wrapContentSize()
                .drawRightBubble(
                    cornerShape = cornerShape,
                    arrowWidth = arrowWidth,
                    arrowHeight = arrowHeight,
                    bubbleColor = Color.Green
                )
        ) {
            Text(
                text = message,
                modifier = Modifier.padding(8.dp),
                fontSize = 14.sp,
                color = Color.Black
            )
        }
    }
}
Output:

And it's a wrap! Hope you'll enjoyed reading this article. Happy learnings! Do share with your friends if you loved this article.

